Wednesday 28 March 2018

NARRATIVE SEQUENCE

This is my final narrative sequence. I used a scrabble board and wrote a small message in each different shot. This is the contact sheet of all the 72 frames. I set up the shoot with a scrabble board placed on a table, then I had the tripod set up above the board with the camera facing downwards. I shot all these photos in camera Raw and slightly adjusted the exposure and contrast to make the scrabble board more visable. After I exported all the photos to jpeg, I then resized all the photos to smaller jpeg so that photoshop was able to handle the the large amount of photos. Once I imported all the photos into a stack in photoshop, I then made sure the timeline was accessable then got all the photos into the timeline. Because the photos go reversed I had to rearrange them for obvious reasons and had it play on repeat. 

the link to the video of the narrative sequence is linked below


Sunday 18 February 2018

SEQUENCE OF DECAY

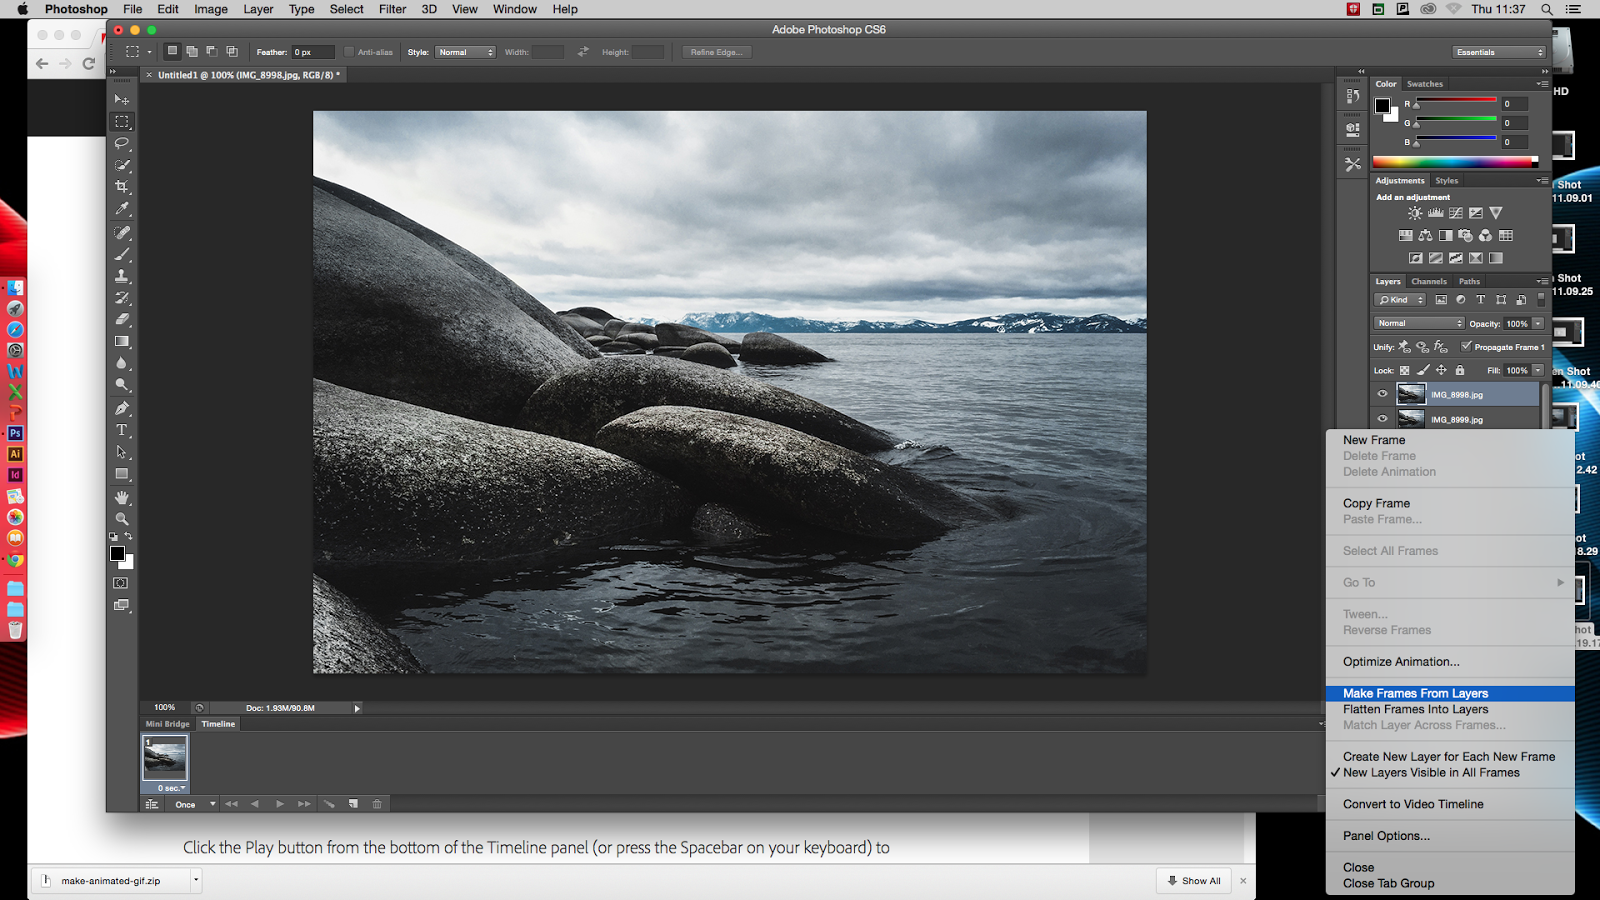
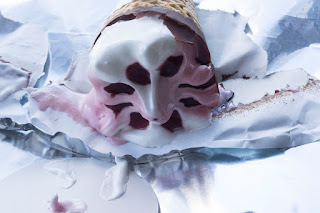
For my sequence of decay I decided to shoot an ice cream melting. As you can see the two photos below are the beginning and end of the sequence. Firstly, I'm really not happy with the camera quality, even though I did use my Nikon DSLR, the lens that I used was 18-55mm zoom lens as I wanted a close up shot. However, using this lens doesn't produce the best images unlike my 35mm lens. Next time I shoot this sequence I'm going to make sure that I use my 35mm lens to get the best photographs from it. I did shoot this sequence as RAW files and then edited them all together in Photoshop Camera RAW. When editing them I decided to make the temperature a little cooler to get that blue undertone. I also adjusted the shadows, highlights, contrast, saturation and clarity make the image look better and bolder overall.

The next thing that went wrong was the fact that I didn't have a automatic timer to set the shutter off on the camera, so I had to manually take the photos in 1 minute intervals. Because I had to manually take the photos, I didn't realise until I imported the photos to make the GIF that every time I took the photo, the camera moved slightly making each shot in a slightly different position which mucked up the overall look of the GIF as the photo frame wasn't in the same place. So for the next time I shoot this sequence, I need to make sure that I have a timer to automatically set of the shutter or to properly secure the tripod so that the camera doesn't move with each shot. I decided to do an ice cream melting because, it showed a fast decay from it being frozen to melted and lost all shape and form in 30mins.


The link to the ice cream melting is below

https://www.youtube.com/watch?v=HcuEI2J_izo

Second Attempt at my Sequence of Decay

This is my second attempt my sequence of decay to try and improve from my melting ice cream sequence. The set up for this sequence was my Nikon D3100 equipped with the 35mm lens. The camera was then attached to a tripod with the camera facing down towards the bunch of unopened flowers. For the next 2 weeks everyday I took a photo of the flowers as they opened up to the end of them wilting and dying. Then once I had all the shot I needed I imported them into camera Raw in Photoshop and saved them as jpeg photos as the NEF files are too large to put into a GIF file. I did this to show the small changes that happens during flowers opening up to dying.


the link to the flowers blossoming is below

https://www.youtube.com/watch?v=KEUlk3pyAy4


Thursday 8 February 2018

HIGH SPEED PHOTOGRAPHY

This was the set up for the high speed photography that we did yesterday. We had a tripod for the camera that had a macro lens on it. Then three tripods with the trigger and light connected to it. We then had a bowl of water to drop the plum in to. What we had to do was have someone ready to drop the plum from the height of the rolled brown paper. Then you also need someone on the camera ready to take the 5 sec exposure and ready to tell the person dropping the plum when to drop it. Then you also needed someone on the flash trigger resetting it for the separate shots. Below are some of the best photographs from the shoot that day.


We used a bowl of water and dropped an apple into it to created the big splash. We used a massive set up for this shoot with a large DSLR camera with a large zoom lens also with infrared triggers to set of the flash when the apple goes through it. The camera is set on a 10 second exposure time so that the camera doesn't miss the shot. The room is pitch black so when the flash goes off the camera only captures the moment when the splash happens. 


Wednesday 31 January 2018

ADOBE AFTER EFFECTS/GIF FILE

This is my final GIF file that I created
The first step into making a GIF file is to import all your photos into photoshop. Once you open all your files they will open as layers. Then go to window, then select timeline and a bar will appear at the bottom of the page. Select the bar that says create video timeline and change it to create frame animation. 


In Adobe after effects I created this small animation of a plane moving in the sky. 

Below is a screenshot of the layout of what inside Adobe After effects looks like. When creating an animation you first need to go into Photoshop and create two different layers, one for the background of the sky then a second of the cutout of the plane. Then save the file to your computer but make sure the layers are able to be edited in After Effects.

Then open After Effects and import your photoshopped image. Where you can see the image click the small arrow to show all the separate layers then drag the sky/background layer into the timeline. Once its in the timeline press the drop down arrow to transform and then press the arrow next to that until you can see the position and scale adjustment. Make sure your at the start of the timeline and click the symbol next to the position. Then make the size of the sky bigger than the frame and drag it to the side slightly. Once you've done this then drag the yellow arrow in the timeline to end of the time, mine was around 15seconds and then drag the sky slightly to the other side just so that when the animation is playing the sky looks realistic as its moving slightly. Once you've adjusted the sky, drag the plane layer into the timeline and place it above the sky layer. From here drag the plane to where you want it to be in the frame. Doing the same steps as the sky in transformation you want to make a keyframe for at the start for the plane to have the size you want, then the end of the timeline you wanna make the second keyframe of the plane smaller than the beginning to make it look as if it's heading of into the sky.


This is the link to my after effects file.

Monday 29 January 2018

EDWEARD MUYBRIDGE / EARLY SEQUENCES OF HORSES

Edweard Muybridge was born April 9, 1830 and died May 8, 1903 and was an English photographer important for his pioneering work in photographic studies of motion, and early work in motion-picture projection. At the age of 20, he emigrated to America as a bookseller, first to New York, and then to San Francisco. In 1860, Muybridge was a successful bookseller and he left his bookshop in care of his brother while he was to go and sail back to England to buy more antiquarian books. However, he missed the boat and instead left San Francisco in July 1860 to travel by stagecoach over the southern route in Saint Louis, by rail to New York City, then by boat back to England. However, in central Texas, Muybridge suffered severe head injuries in a violent runway stagecoach crash which injured every passenger on board and even killed one person. Muybridge was quickly removed form the vehicle but hit his head on a rock or on another hard object. He was taken 150 miles to Fort Smith, Arkansas, for his treatement. He stayed here for three month, recovering from symptoms like double vision, confused thinking, impaired sense of taste and smell etc. Shortly after staying here he went to New York City, where he continued in treatment for nearly a year before being able to sail to England.

During his time recuperating in England he took up professional photography, learning the wet-plate collodion process, and secured at least two British patents for his inventions. He went back to San Fransisco in 1867, and in 1868 his large photographs of Yosemite Valley made him world-famous. In 1875 he travelled for more than a year in Central America on a photographic expedition. In the 1880s, he entered a very productive period at the University of Pennsylvania in Philadelphia, producing over 100,000 images of animals and humans in motion, capturing what the human eye could not distinguish as separate movements.

Muybridge spent his later years giving public demonstrations and teachings of his photography and early motion picture sequences, travelling back to England and Europe to publicise his work. He also edited and published compilations of his work, which greatly influenced visual artists and the developing fields of scientific/industrial photography. In 1894, he returned back to England permanently, then shortly in 1904, the Kingston Museum was opened in his hometown and contained a collection of his equipment.

In 1872, the former businessman and race-horse owner, hired Muybridge for some photographic studies. He had taken a position on a popularly debated question "whether all four feet of a horse were off the ground at the same time while trotting." In 1872, Muybridge began experimenting with an array of 12 cameras photographing a galloping horse in a sequence of shots. The human eye could not break down the action at the quick stride of the trot and gallop. Up until this point of discovery, most artists painted horses at a trot with one foot always on the ground, and at a full gallop with the front legs extended to the rear, and all feet off the ground. So Muybirdge was hired to prove this question. Between 1878 and 1884, Muybridge perfected his method of horses in motion, proving that they do have all four hooves off the ground during their running stride. In 1872, Muybridge settled Stanford's question with a single negative showing the horse airborne at the trot. 

Thursday 18 January 2018

JUSTIN QUINNELL RESEARCH / ANALOGUE / 3 MONTH EXPOSURE

Justin Quinnell was known for his pinhole photography and recently worked as the Pinhole consultant for the movie "The Brothers Bloom" and his cameras are featured in the film. When he was younger, around the age of 4 he had several operations on his eyes as he had a problem with them. He said that he had a patch of one of his eyes with a tiny whole to look through. In addition, in a not very wealthy part of Bristol, he was the head of the photography department. Due to the kids and their parents didn't have the money to spend on a camera, so he got them to make a camera out of their drink cans and he really loved the idea.

This is the final outcome of my lumin pinhole camera, that was exposed for 3 months. What I did was, I stuck it outside my window of my house and it was east facing. As you can see it worked very well and you can see the light trails of the sun rising over for the three months. You can also see some detail in the image from the trees etc. 


Then once I had taken a photo of the pinhole outcome I imported them onto my computer and opened it into photoshop. Then in photoshop I inverted the photo so that the blacks become white and white becomes black. Doing this brought out the detail in the photo and now you can see the trees and theres some slight detail in the other surroundings.


Thursday 4 January 2018

MAKING GIF FILES INTO PHOTOSHOP

This is my final GIF file that I created
The first step into making a GIF file is to import all your photos into photoshop. Once you open all your files they will open as layers. 


Then go to window, then select timeline and a bar will appear at the bottom of the page. Select the bar that says create video timeline and change it to create frame animation. 


NARRATIVE SEQUENCE

This is my final narrative sequence. I used a scrabble board and wrote a small message in each different shot. This is the contact sheet of...